NameSilo rocks! no doubt about that, their pricing is fair and very transparent, their support team is made up of good tech-heads with all the technical know-how needed for managing a domain name.
The only down side of NameSilo as pointed out in our review page is the lack of email hosting for your custom domain names.
If you are hosting your website with blogger and a custom domain name, the need for an email hosting becomes inevitable, hence our reason for creating this guide.
How to Host an Email free With NameSilo
Once you have completed your order for a domain name and configured it appropriately for the service you intend using it for but needs to get your email accounts working already, here’s the steps to follow.
Step 1
- Log in to your NameSilo admin dashboard and find/click domain manager from the right navigation buttons
- Locate the domain name you want to create the email account for and click on it
- Locate Email Forwarding from the left panel and click on Configure
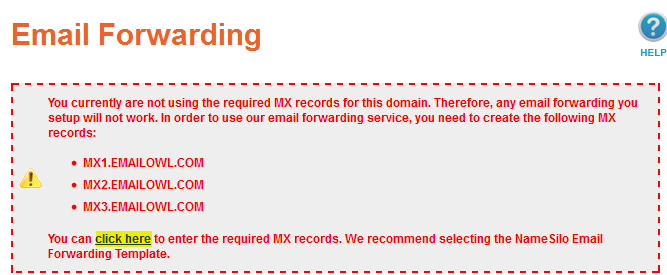
- Create the email account of choice (eg. info) and add the Forwards to address (Usually your primary gmail account or [email protected]). If a warning message as seen in the image below appears, use the click here button to select and apply the Email Forwarding template.
- Click on Submit and continue to the next step.
Step 2
Enable 2 factor authentication on your gmail account by –
- Visit http://www.google.com/landing/2step.
- Click on the get started button and follow other prompt to complete.
- Enable an app password for your gmail SMTP authentication. You can get the app password by following after the instructions here. When prompted select Other for select app and enter in something descriptive like “My Email smtp”.
- Take note of the app password because you’ll be making use of it in the last steps below.
Step 3
- Log in to your Gmail account (the one selected for the Forwards to address in point 4 above).
- Locate & click on the gear icon in the upper right corner of the page and select Settings.
- Navigate to the Accounts and Import
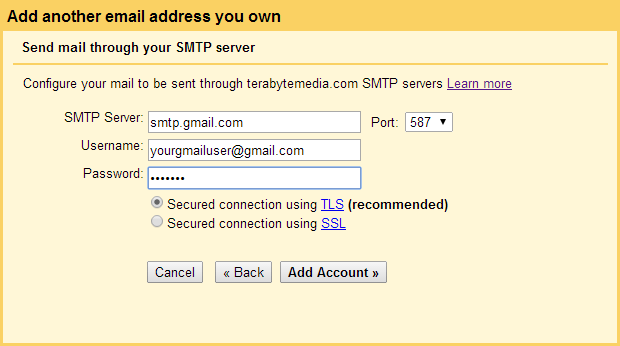
- Locate Send mail as: and click on Add another email address you own
- From the pop-up windows, Enter name and email address (usually the address with your custom domain name eg. [email protected])
- Deselect “Treat as an alias” and click on next
- Remove the values in there and enter Google’s SMTP server values as seen in the image below (smtp server = smtp.gmail.com, username= your_gmail_address, password= your_app_password_created_in_step_2_above)
- Finalize setup and go back to the send mail as: window and check the Reply from the same address the message was sent to box.
Hurrah! Your custom domain name can now receive messages using namesilo email forwarding and send messages using Gmail alias tool.
Note: Those not willing to enable 2 factor authentication on their gmail account can simply authorize Gmail SMTP server for Namesilo by completing these steps.
- Click here, to log into your Gmail account, and then click on Continue.
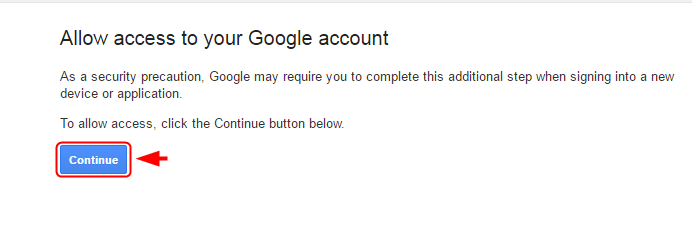
- Click here again to grant access for unsecured app and then continue from step 3 above. Note that step 2 was skipped for this method.


Thank you for your powerful tutorial. It really helps
Hi bro thanks that I have actually set everything up the code has been set and I am actually in the send mail as: section I can see verify but I don’t know how to find the code
The code would be sent to the address you’ve forwarded the emails to.
Ok great, thanks!
I did that then Ii said this:
Authentication failed. Please check your username/password and Less Secure Apps access for access*****@gmail.com.
Server returned error: “535-5.7.8 Username and Password not accepted. Learn more at 535 5.7.8 https://support.google.com/mail/?p=BadCredentials f26sm1338525oop.46 – gsmtp , code: 535″
??
I get the same error as Maria. Please help!
Hi,
I tried your instructions however as I chose not to enable two factor authentication, I followed your instructions and then as you directed went to step 3, however in step 3 it requires the password in step 2 that I did not get as I followed the alternative instructions. What do I put in the password field? It will not let me proceed without a password, therefor not allowing me to do the final step “Finalize setup and go back to the send mail as: window and check the Reply from the same address the message was sent to box.” Help!
Hi Maria,
That’d be your regular Gmail password for the account you’re going to use.
Hi,
At the end of Step 3, Google is sending an email to [email protected] with a confirmation code to verify the addition of the email address. The problem is that since mysite.com is on namesilo, the email is not being forwarded, so am stuck. Any ideas?
That’s the easiest part svads,
First set an email forwarding account for “mysite.com” via namesilo dashboard (you can forward to your primary email account: could be yahoo mail, gmail, outlook or whatever). and then repeat the steps to that very point. Everything should be 100% alright from there.
Do have a productive week ahead Svads
One more question abut this line from your direction:
Finalize setup and go back to the send mail as: window and check the Reply from the same address the message was sent to box
In the Send Mail As, there is only a Reply to Address. I do not see Reply From. Can you do a screen capture of what this step should look like, for us all visual people.
Thanks for your work!
Here’s a screenshot for that Nwaego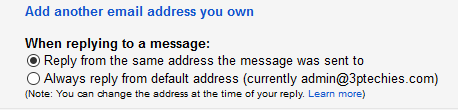
Not working for me.
Whenever I sent an email, I get an error:
Technical details of permanent failure:
Google tried to deliver your message, but it was rejected by the server for the recipient domain domain.com by aspmx.l.google.com. [2a00:1450:400c:c04::1b].
Have you setup the email forwarding? trying sending an email to it from another email
It didn’t work, because I got this message before I finished: Congratulations, we’ve successfully located your other server and verified your credentials. Just one more step!
An email with a confirmation code was sent to (namesilo domain email, which I haven’t got access to yet.).
There was an error in the MX setup process also:
“There were problem(s) with your request:
record does not contain all required values type/host/value/distance
Please make applicable changes and try again.”
It required hostname and target hostname. I didn’t know what to put in.
If I had set up the MX records correctly, how could I then access the namesilo domain emails to verify the Gmail set up?
You have to setup a Namesilo email forwarding to a Gmail account first, so, the verification email would get in to your active email inbox
How am i suppose to get a confirmation email to the address i need verified if the email address isn’t verified? Forwarding wont work because it isn’t verified on gmails end so i can’t get the confirmation email. I followed all the steps. Doesn’t seem possible unless the email address already exist elsewhere.
i think i might know the problem. not sure if you can help. I am forwarding my namesilo domain to godaddy hosting (godaddy nameservers). im getting a warning stating that the nameservers are not namesilo defaults so any changes wont have any effect. If i temporarily change them to the defaults could i get the confirmation email? and then switch it back to godaddy nameservers and it’ll work? Thanks!
Godaddy hosting does come with a full-fledged email hosting option, you can make due with that instead of using this method Rob
thats true but they charge extra per email address. and it doesn’t make sense to pay for something that isn’t as reliable as gmail which is free.
You can create new MX record to use zoho free mail services
Thanks for that Obasi I got it all working fantastically
You are welcome Suz, do enjoy the rest of the week.
I got lost after getting the 16 digit number I couldnt find where to put it
That would be under the SMTP server settings covered in the step 3 section of this tutorial Suz. The password bar, below username box.
Hey Obasi.
You have a great piece here. Does this work for all email links or it is only linked to gmail?
Thanks.
Nick
Technically, it should work for every other email services provider, but then, the settings and configuration is going to be different in some ways.
Hi there, how do you send an email from your domain via a Hotmail account?
Thanks
Do you still need a help with this?
Sorry for the late response.
hi. Thanks for your Article. It’s Really informative for me. Gmail Meter this tips really help for me. thanks