How to create a Free Blog with Blogger.com is one of those topics we should be teaching about , most especially now that google has improved the look and feel of the blogger dashboard with improved tools and snippets support. Now it’s not just only creating blog with it many advance portfolio and business websites have been created using blogger.com cms which is the base of our tutorial today .
There are many quick benefits attached with creating with blogger.com cms which includes:
- Fast Loading ->The platform is already optimized by google themselves
- fast Indexing -> All seo and the likes is already taken care of by google
- Complete Security -> Google handles the security for you
- Free Hosting -> Google host the files for you
- You can easily get help when you run into any problems
Must Read : Beginners’ Guide to creating a Website with Joomla
How Do I Create With Blogger.com
Do you want to express your opinions, or just tell stories from day to day events that mark your life, then it’s time to create your first blog with Blogger for free. The following tutorial will put you through. Here’s a checklist of what to do to create a free blog with blogger.
- Join Blogger
- Make Your first Post
- Change the look of Your blog
Join Blogger:
To join Blogger and create your first blog, click on the “more” link on the Google home page which is at the top navigation menu. In the “More Google Products” that appears, click on the “Blogger”. A faster method is to type www.blogger.com in the address bar of the Web browser.
The creation of your blog is extremely fast since it requires three steps. Click the orange arrow “Create a blog”. In the window that opens, you’ll be notified to create a Google account. If you already have one, simply click on the “log on first.”
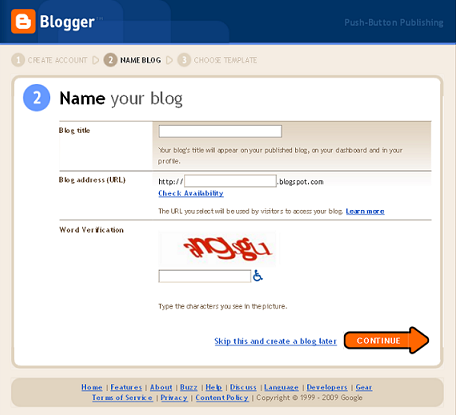
Now you can start the actual creation of the blog. The first step is to enter a pen name (which will be used to post messages) and accept the terms of use. Click “continue” to move to the second phase. You must now choose a title for the blog. Take your time because you cannot go back. Then set the address of the blog, make sure it is free by clicking on the link ‘Check’. If the URL is already taken, alternative names are proposed. Click “continue”.
Note: You do not have to host your blog on Blogspot server. If you prefer to use another provider, click the “Advanced Setup Blog” link and complete the form by providing the technical information you were given by your service provider.
Finally, you must choose a template among the ones provided to you to customize the appearance of your blog. If you have trouble deciding, select a default. You can change it later. To give you an accurate picture of a template, click on the “preview model” link to view full size. Click on the desired template and click the “continue” link.
Making Your First Post
After registration on Blogger, a message tells you that the creation of Your blog is now complete. Click the arrow “Getting started with blogs” to write your first post.
You can create and edit messages in the “Publishing a Message” tab. You can write a post as a word processor, with enrichment characters and formatting options (bold, italic, numbered or bulleted lists, etc.). It is also possible to insert hyperlinks (to refer readers to other Web pages, to files, etc.), Images and video of maximum size of 8 MB and 100 MB
Click the “Preview” link to preview the message. By default, users are allowed to leave comments on the blog. If you want to disable comments for a given post, click the “Options” link. More advanced customization will require you to directly tweak the code of the message by clicking the “Edit HTML” link.
The draft is automatically saved at regular intervals, but do not forget to click on the button “Save Now” when you have finished entering the post. To put it online, click on the “Publish Post”. All posts, whether published or not, are listed under “Edit posts”. It is possible to temporarily remove a blog post as follows: click on the “Publications” link to see a list of posts online. Then click the “Edit” link to the title of the desired message. Finally click on the “Save Draft mode” button. To permanently delete a post, click “Delete” instead of “Edit”.
Must Read Today :Top5 Novice Ready Software To Build Your Small Business Portfolio Website Yourself
Change the Look of Your Blog
To manage the visual appearance and the different graphic elements of your blog, click on the tab “Layout“. By default, the blog consists of five blocks:
- The navbar, located on the upper edge of the window which contains the search field and various buttons.
- The header contains which the original name of the blog. You can add a description and a picture.
- Blog posts contains notes published.
- Blog archive provides a chronological classification of published posts.
- Who are you? Provides a brief description of the author of the blog.
You can insert additional elements (slideshow, poll, list of links, etc.) on the home page of the blog by clicking on the link “Add a Page Element”. Furthermore, it is possible to change the layout of the blog by moving all the items using the mouse (drag and drop technique).
The layout options also allow you to choose another template. Note that there are many more choices at the time of the creation of the blog. If you decide to change the template model, be aware that all changes made from the fonts and colors will be canceled. Therefore, we recommend that you choose a priority model before changing the layout of the blog.
The third tab, “Settings“, is devoted to setting up the blog. It consists of nine sections:
- General – here, for example you can change the title and description of the blog, prohibit its indexing by the search engines or outright deletion. It is also possible to activate two particularly interesting features: Show Quick Edit links on your blog; Allows You, when you are logged into your Blogger account, to edit the messages by clicking on small icons visible on your blog (your visitors will not see them). Show sending e-mail links; Allows readers to forward your messages to their friends via e-mail (via a form).
- Publication – if you own a domain name, you can point it to your blog.
- Formatting – you set the time zone, the format of headers date, language, format, date / time, etc.
- Comments – you can manage posting comments, you define the categories of users entitled to leave comments, and you may choose to moderate comments etc.
- Archiving – you specify the archive frequency.
- Site Feed – it is possible to create a background thread that will allow your readers to be notified of any changes on the blog.
- E-mail – you can update your blog by sending text and images (up to 10MB) by email.
- OpenID – it is a system that allows a user to authenticate to different websites using a single OpenID. In this case, the address of your blog will be used to connect to other OpenID sites.
- Permissions – by default, all users can view your blog. However, you can restrict access to a particular class of persons. You can also allow users to post to your blog.
The “Dashboard” link located on the top edge of the window displays the home page of your Blogger account: In the upper part, you can access links that are used to manage the blog (Messages, Settings and Layout).
Concluding Lines: Now you ‘ve just created your first website on blogger.com right ? Now get started , start posting regularly to make your blog gain popularity and readership , tell your friends about your new blog , share it on facebook , share it in forum and start running adverts on your blog to start making some bucks .
Think I ‘ve omitted something ? Let’s get it rolling in the comments


 on blogger")


")


