Simple tutorial on how to add a customized mailchimp newsletter opt-in subscription form to blogger , joomla , wordpress, smf, drupal and any other website at all without the need of a plugin.
Just a day after using the mailchimp subscription box in my wordpress blog I noticed how awesome it could be having it in ones blog. With this in view I decided to explore it in many other platform I use for business website creation .
Adding the form to joomla, wordpress, smf, drupal, Dreamweaver and simple html sites
Copy the code below and paste it any where you want the code to render mostly the sidebar and footer area. For smf you can use simple portals, simple adds mod or google adds mod to render it in the left block, right block, footer block, inside thread content left and inside thread content right. For other cms and blogger sidebar you can use the html, text and javascript adding box to render it by pasting the code in it and positioning it to the right area .
Here is the code to copy
<div style="padding: 10px; margin-bottom: 5px;" class="contentBox" id="subscribeForm">
    <div style="text-align: left; margin-bottom: 10px;">
      <form id="mysubscribeform" method="post" action="http://obasimvilla.us7.list-manage.com/subscribe/post?"
      name="mysubscribeform">
        <input value="1d1c0a7d82f91db328bba6865" name="u" type="hidden" /> <input value=
        "ba46d7cfc3" name="id" type="hidden" />

        <div style="margin-bottom: 5px;">
          Email Address: <input value="" size="30" id="EMAIL" name="MERGE0" type="text"
          style="border:1px solid #BBBBBB;font-size:12px;padding:5px;" />
        </div>

        <div style="margin-bottom: 5px;">
          First Name : <input name="MERGE1" id="FNAME" size="30" value="" type="text"
          style="border:1px solid #BBBBBB;font-size:12px;padding:5px;" />
        </div>

        <div style="margin-bottom: 5px;">
          Last Name: <input name="MERGE2" id="LNAME" size="30" value="" type="text"
          style="border:1px solid #BBBBBB;font-size:12px;padding:5px;" />
        </div><input value="Subscribe" type="submit" style=
        "-moz-border-radius:5px 5px 5px 5px; background-color:#990000; border:1px solid #BBBBBB; color:#FFFFFF;cursor:pointer;font-weight:bold; padding:5px;" />
      </form>
    </div>
  </div>
Custom Styling :
you can change the background color of the “subscribe” box by replacing :#990000; with any color code of your choice
you can also re-size the boxes by replacing the 30 with any chosen size of your choice
Adding the mailchimp opt-in newsletter subscription form to after post content, before comments in blogger
As norms demands you have to backup your blogger template before editing the template directly. After the backing up of your template you can now proceed with the following simple steps to add a more attractive newsletter opt-in form to blogger .
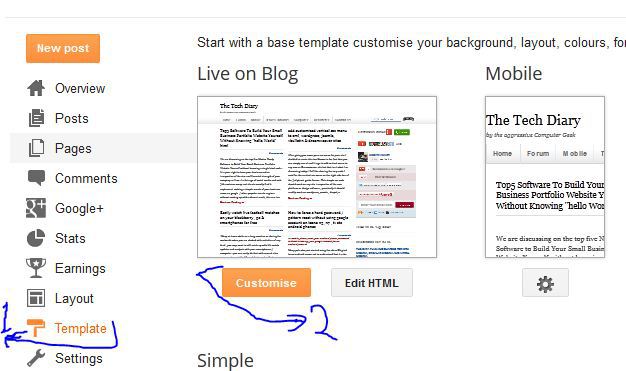
- log in to your blogger dashboard
- go to template and click on customize

- Click on advance
- Click on add css and paste the following css code in the window
/* obasimvilla.com/how-to-add-mailchimp-newsletter-opt-in-form-to-blogger-joomla-smf-drupal-html-sites*/

#newsletterbox {
    background-color: #f5f5f5;
    border: 10px solid #e4e4e4;
    margin-top: 30px;
}
#newsletterbox .white-border {
    border: 1px solid #fff;
}
.newsletterbox-wrap {
    background: url("http://i39.tinypic.com/1rq0pu.png") no-repeat scroll left top transparent;
    margin: -17px -18px;
    overflow: hidden;
    padding: 45px 30px 40px;
    text-align: center;
    text-shadow: 1px 1px #fff;
}

.newsletterbox-wrap h4 {
    text-align: center;
    font-size: 26px;
}

.newsletterbox-wrap p {
    margin: 0 35px 20px;
    text-align: center;
}
.newsletterbox-wrap input[type="email"] {
    background: url("http://i41.tinypic.com/33tsbxz.png") no-repeat scroll left center #fff;
    box-shadow: 0 0 5px #ccc inset;
    color: #999;
    font-family: 'proxima-nova',sans-serif;
    font-size: 12px;
    margin: 0 5px;
    padding: 15px 0 15px 45px;
    width: 40%;
}

.newsletterbox-wrap input[type="submit"] {
    box-shadow: 0 1px 1px #a24a1d;
    font-size: 14px;
    font-weight: bold;
    padding: 10px 15px;
    text-transform: uppercase;
}
5. click on “apply to blog” and proceed to the next step
6. From the template again click on “edit HTML’ and search for
<data:post.body/> or
<p><data:post.body/></p>
for most templates, immediately below it paste this code
<div id="newsletterbox">
<div class="white-border">
<div class="newsletterbox-wrap">
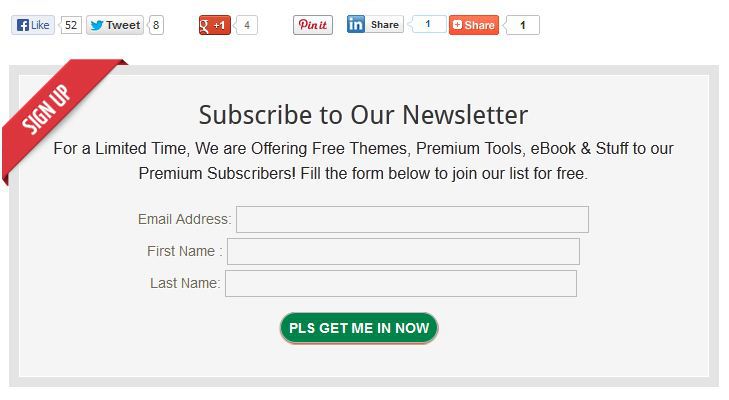
<h4>Subscribe to Our Newsletter</h4>
<p>For a Limited Time, We are Offering Free Themes, Premium Tools, eBook & Stuff to our Premium Subscribers! Fill the form below to join our list for free.</p>
<form id="mysubscribeform" method="post" action="http://obasimvilla.us7.list-manage.com/subscribe/post?"
name="mysubscribeform">
<input value="1d1c0a7d82f91db328bba6865" name="u" type="hidden" /> <input value=
"ba46d7cfc3" name="id" type="hidden" />
<div style="margin-bottom: 5px;">
Email Address: <input value="" size="50" id="EMAIL" name="MERGE0" type="text"
style="border:1px solid #BBBBBB;font-size:12px;padding:5px;" />
</div>
<div style="margin-bottom: 5px;">
First Name : <input name="MERGE1" id="FNAME" size="50" value="" type="text"
style="border:1px solid #BBBBBB;font-size:12px;padding:5px;" />
</div>
<div style="margin-bottom: 5px;">
Last Name: <input name="MERGE2" id="LNAME" size="50" value="" type="text"
style="border:1px solid #BBBBBB;font-size:12px;padding:5px;" />
</div><input value="Pls Get me in Now" type="submit" style=
"-moz-border-radius:5px 5px 5px 5px; background-color:#018249; border:1px solid #BBBBBB; color:#FFFFFF;cursor:pointer;font-weight:bold; padding:5px;" />
</form>
</div>
</div>
</div>
save and preview any of your single post to confirm it is working really fine
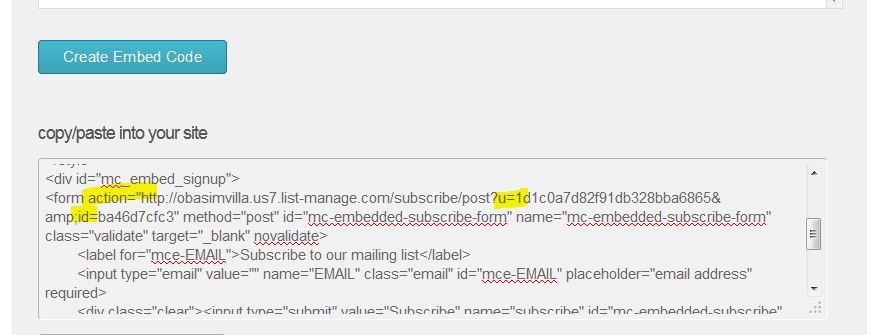
remember to add your own mailchimp variables following the guide on this article and the screenshot below
Feel free to ask us any question, also leave your valuable comments

")


hi, how do i do this in blogger
Use the custom html and CSS code provided in the post body.
Thank you for this. Just added one on my website!
It is showing all over my home page, any idea how to make it appear only below a post without showing on homepage
Thanks for dropping by bro,
What platform is that?
Its Blogger
Interchange for various
or
for those of them that has more than 1.
If there’s Google adsense or social media sharing icons manually added to the template already,
You can figure the right position to place the code
Nice tutorial bro, but how do i move the “pls get me in” button to the right instead of left
Just modify the CSS code to achieve that bro
Thanks for your feedback Tags, do have a great week already
i’ve already figured out the problem. I really appreciate your tutorial. many thanks.
Hi Obasi,
Thanks for this great tutorial,however I this message when I clicked subscribe.
Sorry, the page you were looking for in this blog does not exist.
Can please walk me through this problem?
Thanks
after using the code on wordpress it was just showing me that of the default wordpress themes
Maybe you forgot adding moz border radius to your styling, please do check again
Thanks for this tutorial, hopefully it’ll increase my subscriber
thanks for sharing!
We use this on our blasts!
It is a much more attractive form than I’ve used before. Thanks for the info which is really easy to understand.
Great instructions. So important to have an opt in form on your blogs. I am not a mail chimp client but your opt in form looks great.
Thanks! Great info, easy to read, awesome stuff to know, definitely will be implimenting this!
Thanks man i have actually been looking for a good way to add a capture page to my blog :]
Thanks for the info! Really good easy to understand your tutorials!
before I switched to aweber I would always use mailchimp, which was a real pain in the ass for me, so it’s good help here for people who use mailchimp that’s for sure
Thanks for dropping by Nick, I will be trying aweber in the future when my subscribers base increases
Love this great step by step instruction. Thanks
Thanks for the info! Very handy :)
Great instruction! Thanks!
great info thanks