Regular transfers across mobile devices have come to stay. Whether it be from Android to iPhone, iPhone to Android, Android to Android, or even iPhone to iPhone (iPad and other iOS devices), this sort of transfer is what you’re going to do betimes. No matter what the reasons for doing or wanting to do iPhone data transfer are, here are 2 easy ways to perform iPhone data transfer like a pro.
Why Do iPhone Data Transfer?
Transferring data between iPhones has become a vital task in our interconnected digital landscape. Let’s delve into the reasons behind the essential nature of this process:
- Upgrading to the Latest iPhone Model: Users frequently embrace the latest iPhone models, making data transfer pivotal for a seamless transition to the new device without sacrificing crucial information.
- Replicating Apps and Settings: Data transfer involves mirroring applications and settings, eliminating the need for users to invest time and effort in setting up their new iPhones from the ground up.
- Preservation of Multimedia Content: iPhones house a wealth of multimedia content, from photos and videos to music. The transfer of this content to a new device ensures the preservation of cherished memories and entertainment libraries.
- Preventing Data Loss: In the absence of proper data transfer, users face the risk of losing valuable information such as contacts, messages, and other crucial data stored on their previous iPhones.
In essence, performing iPhone data transfer is not merely a task but a necessity in safeguarding and seamlessly transitioning the wealth of digital content that has become integral to our daily lives.
How to Do Data Transfer Between iPhones: The 2 Easiest Ways
The way to transfer data between iPhones is quite simple and easy. This section will offer valuable insights tailored to your specific needs. Continue reading to explore seamless ways to transfer all your iPhone data.
Way 1: One-Click Transfer Data from iPhone to iPhone
When you need to transfer your data from iPhone to iPhone, the most convenient way to do this is to use a specialized iOS data transfer tool called FoneTool. This tool is crafted by a skilled team with more than a decade of expertise in data security, which offers an intuitive interface designed to facilitate the transfer of all iPhone data, including photos, videos, music, contacts, messages, and more.
Highlights of Using FoneTool to Transfer Data from iPhone to iPhone:
- Easy One-Click Transfer: FoneTool simplifies the data transfer process with a one-click solution that minimizes the complexity and time required for users to migrate data between iPhones.
- Comprehensive Data Transfer: FoneTool supports the transfer of a wide range of data, including photos, videos, music, contacts, messages, and more, providing a comprehensive solution for users migrating all data.
- No Network Connection Required: FoneTool enables data transfer between iPhones without the need for an Internet connection, ensuring convenience and privacy.
- User-Friendly Interface: FoneTool is designed with a user-friendly interface that makes the data transfer process intuitive and suitable for users of all levels of technical expertise.
So, how do you one-click transfer your data from one iPhone to another with this iPhone transfer software? Here’s how to do it:
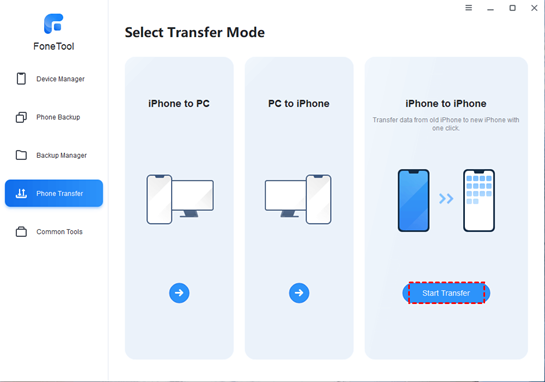
Step 1: Initiate FoneTool and connect both iPhones to your computer ==> Navigate to Phone Transfer ==> Choose the iPhone to iPhone transfer mode and click on Start Transfer.
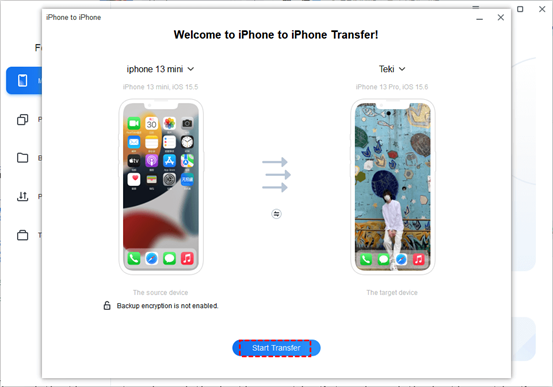
Step 2: Enable Backup Encryption to safeguard your private information ==> Click Start Transfer to initiate the seamless data transfer process.
 In addition, if you don’t want to transfer all data to the new iPhone, you can make use of FoneTool’s iPhone to PC ==> PC to iPhone to transfer the desired data. Follow the simple steps:
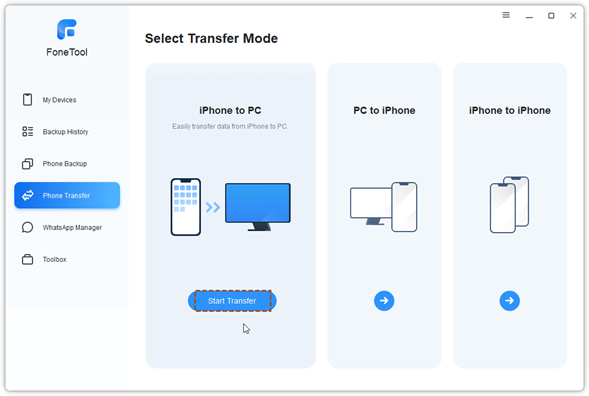
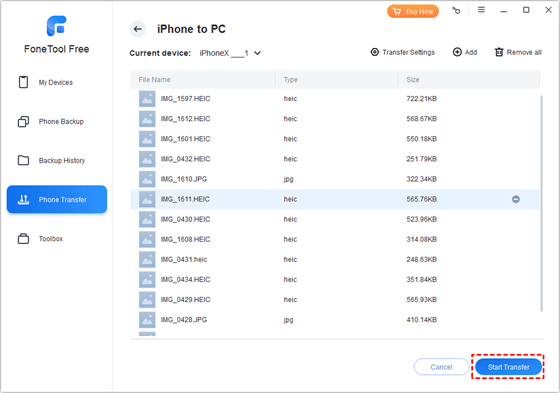
Step 1: Connect your source iPhone to PC ==> Navigate to Phone Transfer on the home page of FoneTool ==> Select iPhone to PC and then click the Start Transfer button.
 Step 2: Click icons (such as Photos, Music, Videos, etc.) to preview and select the files that you wish to transfer and confirm with OK.
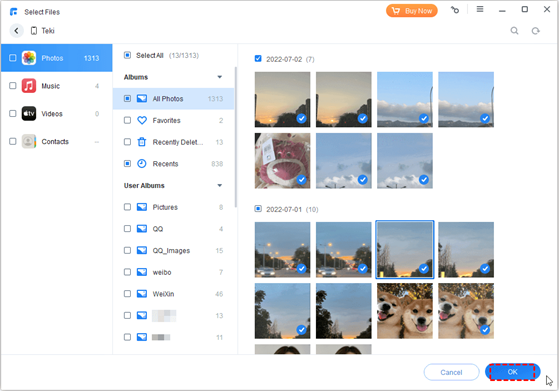
Step 3: Choose a storage path for your files in Transfer Settings and kickstart the transfer by clicking the Start Transfer button.
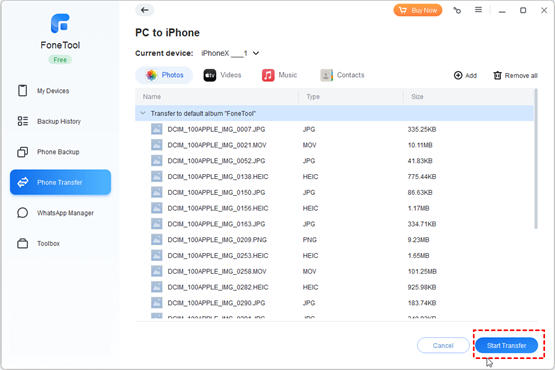
Step 4: After that, connect the target iPhone to the PC ==> Select the PC to iPhone mode to pick files ==> initiate the process with a final click on the Start Transfer button.
Way 2: Use iCloud – The Official Way to Sync Data from iPhone to iPhone
Utilizing Apple’s iCloud is a seamless method to synchronize iPhone data effortlessly. Each user is provided with a generous 5GB of free space to securely back up or transfer essential elements like photos, videos, music, messages, and more.
So, how do one sync data from iPhone to iPhone via iCloud? There are 2 parts to help you do that, and you can follow the simple instructions below.
Part 1: Backup Old iPhone to iCloud
To do this conveniently, you’ll need to complete the few steps below:
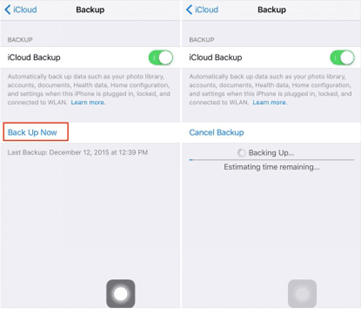
Step 1: Navigate to Settings on your old iPhone ==> Tap the Apple ID [Your Name] banner and access the iCloud Backup option.
Step 2: Confirm that iCloud Backup is enabled and initiate the backup process by selecting Back Up Now.
Part 2: Restore to the New iPhone
Step 1: Power on your new iPhone and follow the setup guide to configure language, region, and network preferences.
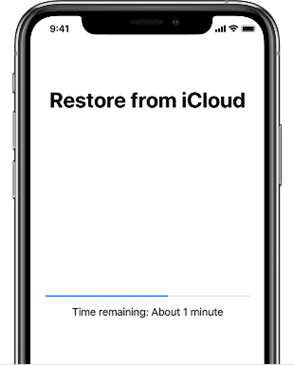
Step 2: Choose the Restore from iCloud backup option when prompted to choose a data restoration method.
Step 3: Choose the most recent backup and proceed with the on-screen instructions to seamlessly transfer data from your old iPhone to the new device.
Other Tips:
- While iCloud offers 5GB of free storage, this may be insufficient for users to back up all data on iPhones, potentially necessitating the purchase of additional storage space.
- iCloud backups require a stable Internet connection. Uploading a large number of iPhone files to iCloud can be time-consuming, especially for users with slow Internet connections.
The Bottom Line
That’s all about how to transfer data between iPhones. In this post, you already have mastered 2 easy and useful ways to migrate your data from your old iPhone to your new iPhone via FoneTool and iCloud. However, if you are tired of countering network or storage issues, FoneTool will be a good option for you.
With the help of this tool, you can easily transfer data from iPhone to iPhone with one click. Most importantly, you can erase iPhone after transferring all data to a new iPhone. Why not try it out and let us know how easy it is – using Fonetool app to do iPhone to iPhone transfer?


