
Did your monitor go blank? Or is it flickering? Sometimes, the reason your monitor may be acting up is because of a cheap display cable or your desktop resolution/screen settings, and all the while, you thought it was a hardware failure. Don’t get me wrong, monitors can go blank or flicker due to hardware problems, but most times, these things happen due to mismatched settings and display cable incompatibilities. Nonetheless, the popular monitor problems and their easy solutions or probable fixes will be shared here for your learning.
The 7 Popular Monitor Problems and How To Fix Them Like a Pro
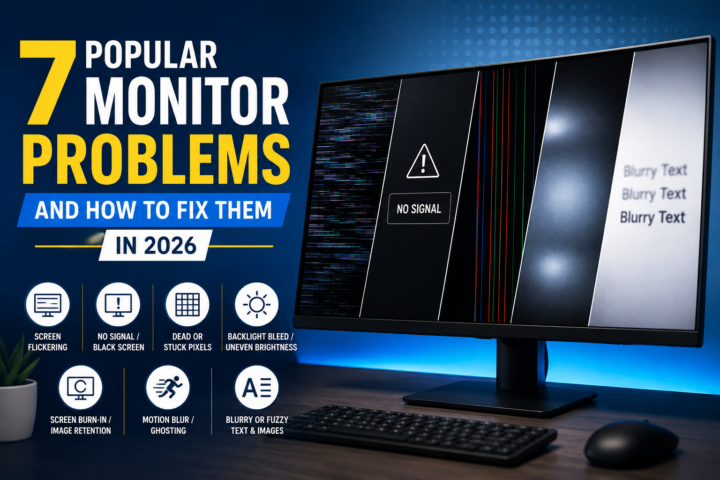
Before we get into the fixes, it helps to know that most display issues fall into one of these three categories:
- A signal/cable problem
- A PC settings/driver problem
- A hardware/panel problem
If any of these DIY solutions did not work to fix your monitor problems, chances are that you’ve got a more serious hardware problem, and you should consult a PC technician to assess the issue.
1. Screen Flickering
A flickering monitor screen is right about the most common fault you can face with a desktop or laptop PC. It is the irregular, distracting flashes of your display, as though your monitor is blinking an eye rapidly. Screen flickering can distract you from whatever you’re viewing on a monitor’s display. However, most of the time, this is caused by the screen refresh rate you set for your monitor’s display.
Causes:
- Refresh rate settings
- Cheap/weak display or signal cable
- Unsupported display cable connection
- G-Sync, FreeSync, or VRR (Variable Refresh Rate) settings
Fixes
- If you recently upped your monitor’s display refresh rate to 120Hz, 144Hz, or above, and started seeing it flicker, then you’re likely dealing with a signal bandwidth issue rather than a broken panel. For example, if your monitor is connected via a DisplayPort 1.4 cable, which carries 4K at up to 120Hz uncompressed, setting your display’s refresh rate above 120Hz exceeds the cable’s bandwidth and can cause issues like flickering.
- If the flicker specifically appears with G-Sync, FreeSync, or VRR (Variable Refresh Rate) turned on, then turn either of the settings off.
- Try another display cable; maybe the current one you’re using has gone bad, and if you bought it new, then maybe it’s a cheap one that’s not compatible with your monitor.
2. No Signal Or Black Screen
Here’s another common problem; this time, your screen stays completely blank without anything showing. It’s mostly called a BSOD (Black/Blue Screen of Death). While sometimes it could be that your monitor is broken, especially if it probably had a hard-impact fall, most of the time this could be your display driver playing tricks on you.
Causes
- Wrong monitor input (your monitor is in HDMI input, but you connected a USB-C or vice versa)
- The PC hasn’t been shut down for a very long time
- You connected the monitor using a cheap or damaged cable
- Driver problems
Fixes:
- Confirm that the monitor is actually set to the input you’re using (HDMI 1, HDMI 2, DisplayPort, or USB-C) rather than relying on auto-detect, which frequently fails to wake up after standby or a cold boot.
- Turn off the monitor and PC, unplug the monitor’s video cable for about 30 seconds, reconnect it, power the monitor back on, then boot the PC.
- If the step above doesn’t work, swap the display cable and try a different port on your GPU or motherboard, since a cheap or worn cable is responsible for a large share of these cases. Also remember that HDMI and DisplayPort cables aren’t interchangeable, even when the connector looks similar on an adapter.
- If the screen flashes on briefly before dropping to black, or the fault started right after a driver or Windows update, boot into Safe Mode or roll back the graphics driver update. If you didn’t update any driver before the fault started, then try updating your drivers in Safe Mode.
- For USB-C monitors, double-check that the port on your laptop actually supports DisplayPort Alt Mode; not every USB-C port carries video, and a charging-only cable won’t transmit a picture no matter how good the monitor is.
3. Dead Or Stuck Pixels
A dead pixel appears as a permanent black dot on the monitor that can’t be cleared off. In contrast, a stuck pixel is usually a sub-pixel that’s stuck showing a specific color like red, green, or blue, and it’s often the result of a signal or voltage issue rather than a fully broken pixel transistor, which means it can sometimes be fixed. To tell them apart, display a solid white image, then a solid black one, and inspect the spot closely. A dot that stays black on both is dead. A dot that shows a fixed color is stuck.
Causes:
- Manufacturing fault
- Transitors failure
- Constant overheating
Fix:
For stuck pixels, you can opt for pixel-fixing software tools; not guaranteed, but can work sometimes. If you’ve just bought the monitor, check the manufacturer’s dead pixel policy before trying to fix anything yourself. Most brands tolerate one to three dead pixels as within acceptable manufacturing standards, but a single pixel sitting in the dead center of the screen often qualifies for a swap regardless of the total count.
4. Backlight Bleed or Uneven Panel Brightness
If you’ve ever loaded a dark scene in a movie or game and noticed a hazy, grayish patch glowing near one of the corners, that’s backlight bleed. It happens on LCD and IPS panels because the backlight sits behind the display layer, and imperfect seating or manufacturing tolerances let some of that light leak through around the edges where it shouldn’t.
Causes:
- Manufacturer’s fault
- Improper balancing of the backlight panel after decoupling the monitor for repair
Fix:
Unfortunately, software calibration cannot fix backlight bleed. What you can do is reduce its visibility by lowering your monitor’s overall brightness, and avoid working in a pitch-black room where it’s most visible. Persistent, obvious bleed on a monitor you just bought is a legitimate reason to request an exchange.
5. Screen Burn-In and Image Retention
On OLED monitors, each pixel generates its own light and physically wears down the more it’s used, which means static elements like a taskbar, browser tabs, or a game HUD that sit in the same spot for hours can leave a faint, lasting ghost of themselves behind. The first thing to figure out is whether you’re actually looking at burn-in or the far more common (and reversible) image retention.
Retention shows up after a long session with a static image and typically fades once you change what’s on screen or after the panel runs its maintenance cycle. True burn-in doesn’t go away regardless of what you display afterward. If you’re not sure which one you have, change the content on screen and give it a few hours; if the mark is gone, it was retention.
Causes:
- Long use of the monitor can cause retention, which lasts for a few seconds
Fixes:
- Modern OLED monitors ship with built-in protection you should actually leave switched on, such as Pixel Shift and Pixel Refresh or Panel Care.
- Auto-hide your taskbar.
- Keep brightness at a moderate level and use dark themes where possible.
6. Motion Blur or “Ghosting”
Ghosting is the faint trail or shadow-like silhouette following anything moving quickly across the screen, most noticeable in fast-paced games or when scrolling quickly through a webpage. It happens when a pixel can’t finish transitioning from one color to the next before the monitor refreshes again, leaving a bit of the “old” image behind.
Cause:
The main lever here is your monitor’s response time, sometimes called “overdrive,” “trace free,” or “OD” in the on-screen display menu. Overdrive works by boosting the voltage sent to pixels so they change color faster, and tuning it correctly usually clears up ordinary ghosting. The trap is pushing it too far: an overdrive setting that’s too aggressive causes inverse ghosting, where you get a bright or colored halo trailing behind moving objects instead of a dark smear.
Fix:
If you see white or colored outlines chasing your cursor or in-game characters, dial the overdrive setting down a notch rather than up. Testing the Normal, Fast, and Extreme presets one at a time is the best way to troubleshoot this issue.
7. Blurry or Fuzzy Text and Images
A blurry display is easily the easiest of these seven problems to fix, because it’s rarely a hardware fault. The most common cause by far is running the monitor at a resolution or scaling percentage that doesn’t match its native specs.
Cause:
Every LCD, IPS, and OLED monitor has one true resolution it’s built for, and any other resolution requires the image to be stretched or interpolated, which softens fine detail and makes text look fuzzy no matter how sharp the panel actually is.
Fix:
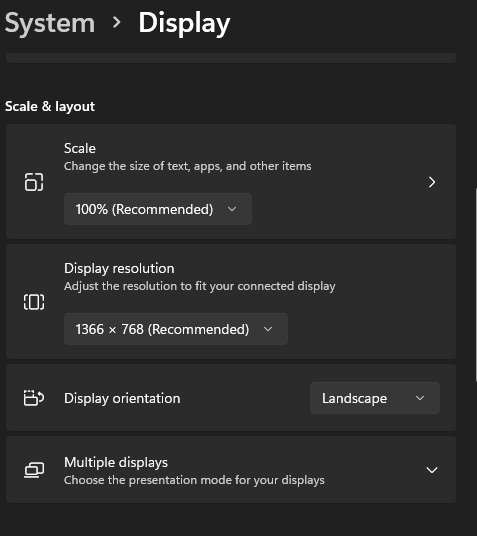
On Windows, go to Settings > System > Display and confirm the resolution is set to the one labeled “Recommended.” If text still looks off at the correct resolution, check the Scale setting just above it and set it to recommended too.
On a Mac, head to System Settings > Displays and make sure you’re on the “Default” or “Best for display” option rather than a scaled resolution.
If the resolution and scaling both check out and the blur is still there, an outdated or loose cable connection is the next suspect, particularly on older VGA or DVI setups where a bent pin or a loose connector can genuinely soften the image. Try updating your graphics driver and using a different display cable to see if the issue gets resolved.
What More?
These are common monitor problems we’re aware of; is your monitor showing a different sign from those mentioned here? Well, if your monitor is showing multiple vertical or horizontal lines, change your display cable or use a different display technology; for example, switch from HDMI to VGA or USB-C. If the issue persists, consult a PC technician.